Passed Down. Lovingly Preserved. Deliciously Nostalgic.
There’s something magical about making jam from scratch. Maybe it’s the scent of bubbling strawberries filling the kitchen, or the way the simple act of preserving fruit feels like time slows down — a moment of connection between the past and the present.
This strawberry jam isn’t just a recipe — it’s a legacy. Inspired by the handwritten notes found in an old family cookbook, this version is sweet, slightly tart, and incredibly rich in strawberry flavor. What makes it different? A touch of lemon juice to balance the sweetness, and a slow simmer to bring out the berries’ deepest flavor.
It’s the kind of jam you’d find at a farmer’s market in the French countryside. Or wrapped in a linen cloth with a bow, gifted from your grandmother’s kitchen. It’s thick, glossy, and spreads like a dream on toast, scones, or a warm croissant.
Ingredients
2 lbs fresh strawberries, hulled and halved
1 tbsp lemon juice
1 ¾ cups granulated sugar
(Optional) 1 tsp vanilla extract for a floral finish
Instructions
1. Sterilize your jars
Wash jars in hot soapy water or run them through the dishwasher on high heat. To sterilize further, place jars (not lids) in a 250°F (120°C) oven for 10–15 minutes. Let them cool slightly before filling.
2. Prep the strawberries
Place strawberries in a large, heavy-bottomed pot. Use a potato masher to gently crush some of the fruit — leaving chunks for texture.
3. Add lemon juice & sugar
Stir in the lemon juice and sugar. Let it sit for 5–10 minutes to draw out the juices.
4. Slow simmer magic
Bring the mixture to a gentle boil over medium heat, stirring occasionally. As it bubbles, the jam will begin to thicken. Simmer for 20–25 minutes or until it passes the “wrinkle test” (see tip below).
5. Optional flavor touch
If using, stir in vanilla extract right before removing from heat.
6. Jar & seal
Ladle hot jam into warm jars, leaving ¼ inch at the top. Wipe the rims clean and seal with sterilized lids. Allow to cool completely.
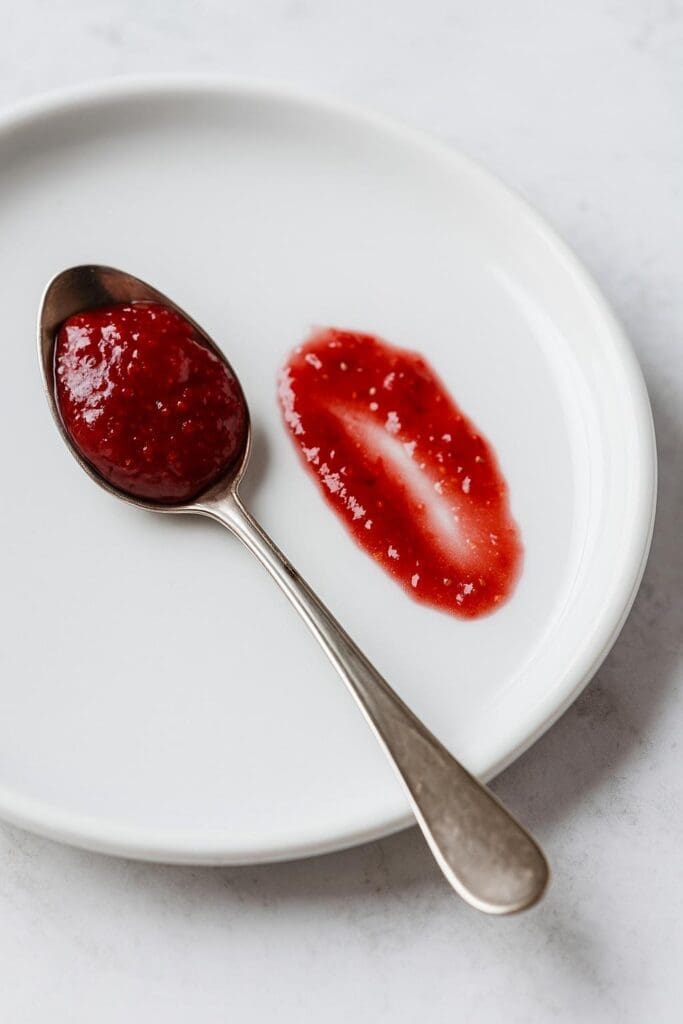
Pro Tip: The Wrinkle Test
To test if the jam has set, spoon a small amount onto a chilled plate and pop it in the freezer for 1–2 minutes. Run your finger through it — if it wrinkles and holds its shape, it’s ready.
Pin it. Save it. Gift it.
Tie a ribbon around the jar, add a kraft tag, and it becomes the perfect handmade gift. Or just keep a stash in your fridge for rainy morning breakfasts.
Tried the recipe?
We’d love to see your homemade vintage strawberry jam! Share a photo and tag us on Instagram and let’s savor the little joys together!
Don’t forget to subscribe to our newsletter for more cozy creations straight to your inbox.


COMMENTS